
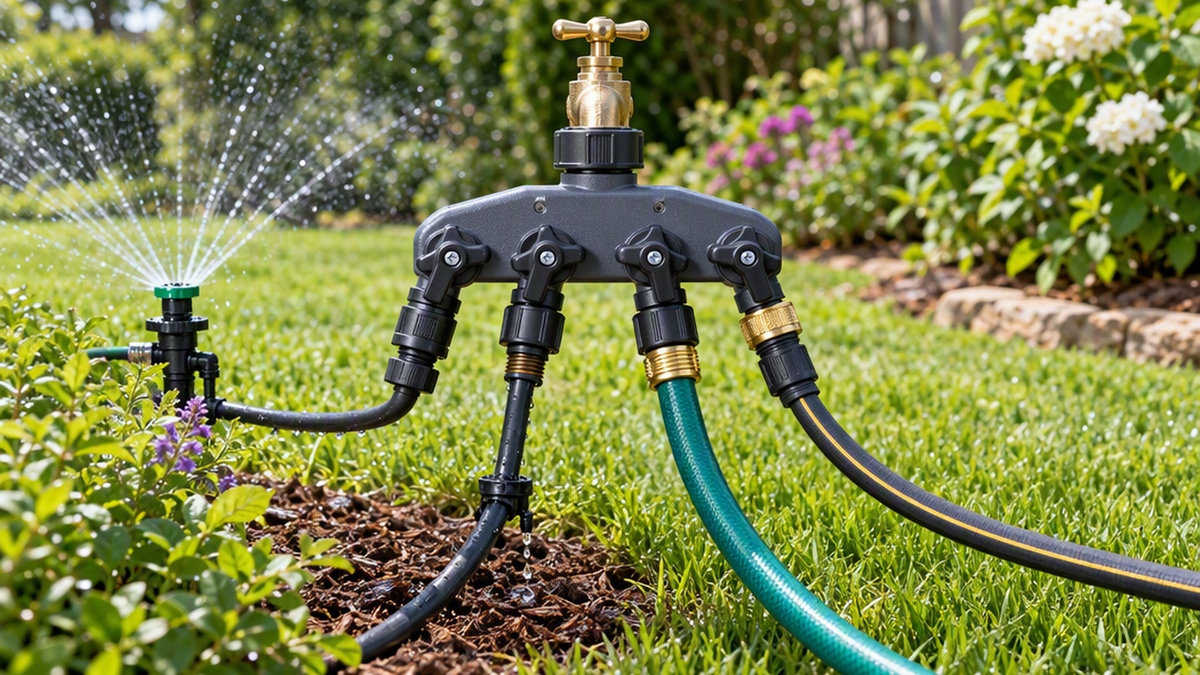
If you have ever dragged a hose across the yard just to switch from the sprinkler to the vegetable bed, you already know the problem: most homes have one outdoor tap and a lot of watering jobs. A garden hose splitter solves it by turning one spigot into several outlets, each with its own shut-off valve.
It sounds simple, and it mostly is, but a few details decide whether your splitter works smoothly for years or drips and sputters from day one. This guide covers how splitters work, how to install one, and how to avoid the common mistakes.
What a Hose Splitter Does
A splitter screws onto your outdoor faucet and gives you multiple hose connections. Each outlet has its own valve, so you can leave several hoses attached and turn each one on or off independently. That means you can leave a sprinkler on the lawn, a drip line on the beds, and a hose reel ready to go, all hooked up at the same time.
Our 4 way heavy duty brass garden hose splitter is a good example: it is a 3/4 inch solid brass splitter that gives one outdoor tap four independently controlled outlets, so a sprinkler, a drip line, a hose reel and a spare can all stay connected.
Why Brass Is Worth Considering
Splitters live outdoors, take a beating from sun and frost, and are constantly twisted on and off. Solid brass is a long-time favorite for hose fittings because it is sturdy and does not rust the way cheaper metals can. Plastic splitters are lighter and cheaper, but threads and levers can crack with age or after a hard freeze. If the splitter will be a permanent fixture on your spigot, brass is usually the better long-term choice.
You can browse more options in our garden watering and hose fittings collection.
How to Install a Splitter, Step by Step
- Turn off the water. Close the faucet fully before you attach anything.
- Check the washer. Make sure a rubber washer is seated inside the splitter's female connector. A missing or flattened washer is the number one cause of leaks.
- Thread it on by hand. Screw the splitter onto the faucet by hand, turning the collar, not the valves, until snug. Overtightening with a wrench can damage the washer or threads.
- Close all four valves. Before turning the water on, shut every valve on the splitter.
- Attach your hoses. Connect each hose, sprinkler or drip line to its own outlet and hand-tighten.
- Turn on the faucet slowly. Open it gradually and check for drips at the faucet connection.
- Open one valve at a time. Open each outlet individually and check its connection before opening the next.
Getting Good Water Pressure
A splitter does not create more water. It shares what your tap supplies. If you open all four outlets at once, flow to each will drop. To keep pressure strong:
- Run only the outlets you need. That is the beauty of individual valves.
- Use the right hose diameter. A 5/8 inch hose delivers more water than a 1/2 inch hose.
- Avoid kinks. Straighten hoses and use a reel or guide to reduce bends.
- Match the tool to the flow. Drip lines and soaker hoses need only a trickle, so they pair nicely with a higher-flow outlet running a sprinkler.
Smart Ways to Use a Splitter
Lawn plus garden beds
Keep a sprinkler on one outlet and a drip line on another. Run each at its own time of day without touching the faucet.
Always-ready hose
Leave one outlet for a hose with a spray nozzle on the end. When you need to rinse the patio or fill a bucket, it is ready to use. For a nozzle that suits the task, see our guide to choosing the best garden hose nozzle.
Washing and cleaning
Keep one outlet free for car washing, pet bathing or cleaning tools, without disturbing the watering setup.
Add Shut-Off Valves for Even More Control
If you want to swap hoses or attachments without going back to the tap, add an inline shut-off valve at the hose end. Our 3/4 inch solid brass hose shut-off valve 2 pack includes washers and is made from solid brass for durability. This lets you change a sprinkler or nozzle with the water still running at the splitter.
Common Mistakes to Avoid
- Overtightening: Hand-tight plus a small nudge is usually enough. Too much force can crush the washer.
- Leaving the splitter on in freezing weather: Trapped water expands as it freezes and can crack fittings. Remove hoses and splitters before frost, as we explain in our guide to winterizing your garden hose and outdoor faucets.
- Opening all valves with nothing attached: This wastes water and sprays everywhere.
- Skipping washer checks: Washers wear out. Replace them at the first sign of drips.
- Heavy loads on the faucet: Four hoses can be heavy. Support them with a hose hanger or stand so the weight does not strain the spigot.
Troubleshooting Leaks
If water sprays from the faucet connection, turn off the water and check the washer. If a hose connection drips, make sure the hose end is threaded straight and the washer is seated. If a valve leaks when closed, flush it by briefly opening the valve to clear debris. If none of this works, our guide to fixing a garden hose that leaks at the connection covers the rest.
Final Thoughts
A good splitter turns a single tap into a flexible watering station. Choose a solid build, check your washers, hand-tighten, and open one valve at a time, and you will save hours of hose juggling every season.
Ready to simplify your watering? Shop our Garden Watering & Hose Fittings to build your setup.