
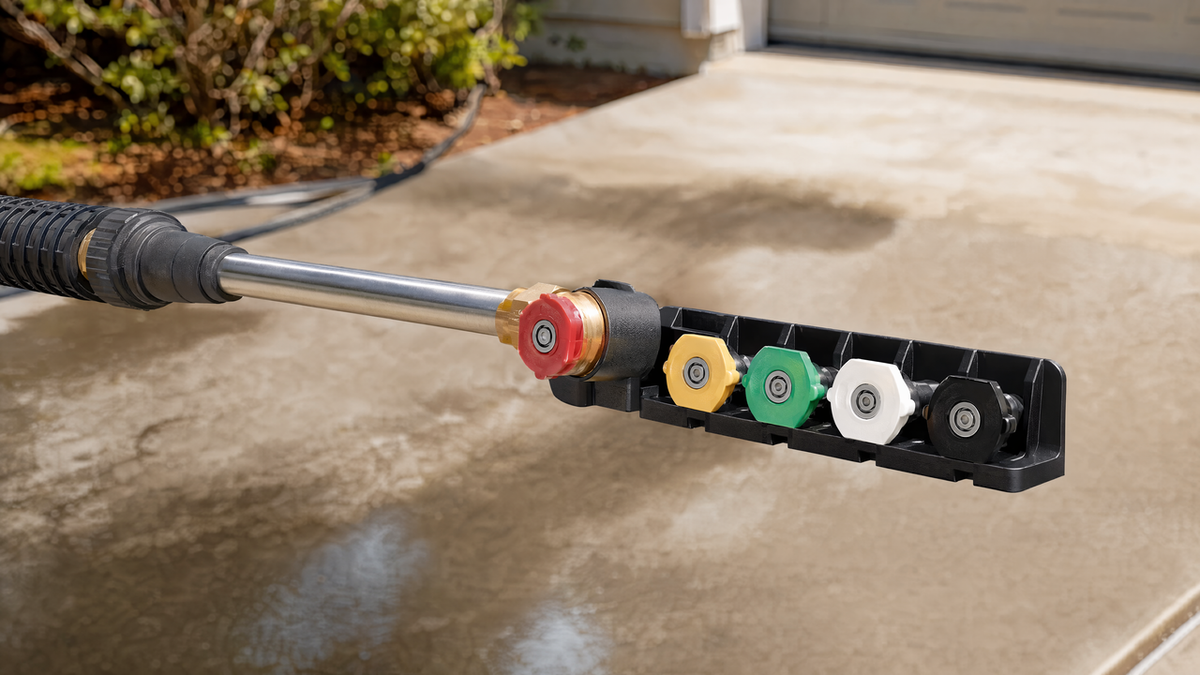
Every pressure washer ships with a handful of color-coded nozzle tips, and most people grab whichever one is already on the wand. That is how decks get gouged, paint gets stripped by accident, and siding ends up with water forced behind it. The colors are not decoration. Each one sets the spray angle, and the spray angle decides how much force hits the surface. Learn the five colors once and you will clean faster, do less damage, and stop wasting an afternoon going back over the same patch of driveway.
This guide explains what each pressure washer nozzle color means, which surface each one belongs on, and how to swap tips without leaks. If you are still deciding what machine to buy, our PSI guide for driveways, decks, cars and siding covers that side of the question.
Why the Spray Angle Matters More Than the PSI Rating
A pressure washer pushes a fixed amount of water through the nozzle. A narrow angle concentrates it into a thin, hard stream; a wide angle spreads it across a fan, so each square inch takes far less force. That is why a 3000 PSI washer with a 40-degree tip is gentler on wood than a 2000 PSI washer with a 15-degree tip. The colors are standardized across brands, so a green tip from any manufacturer sprays the same 25-degree fan. The only thing that changes between sets is the orifice size, which should match your machine's flow rate in gallons per minute (GPM).
Pressure Washer Nozzle Colors Explained
Red: 0 Degrees
The red tip fires a pencil-thin jet with all of the machine's force behind it. It will etch concrete, splinter wood, and cut through paint, rubber, and skin. Most homeowners never need it; the only reasonable uses are blasting caked mud off steel equipment or hitting a stubborn spot of rust on metal. If you use it at all, keep it moving and stay a couple of feet back.
Yellow: 15 Degrees
Yellow is the stripping and surface-prep tip. The narrow fan still carries a lot of force, which suits it to removing loose paint, lifting heavy grease from a garage floor, or cleaning oil stains off concrete. It is too aggressive for wood decks, vinyl siding, and cars. Hold it about 12 inches from the surface and overlap your passes so you do not leave stripes.
Green: 25 Degrees
Green is the tip you will use most. It has enough force to clean concrete driveways, patios, sidewalks, brick, and outdoor furniture, but the wider fan covers ground quickly and is far less likely to leave marks. For a typical fall cleanup of the driveway and patio before winter, start with green and only drop to yellow on spots it will not lift.
White: 40 Degrees
White is the gentle tip. Use it for wood decks and fences, vinyl and painted siding, windows, gutters, cars, boats, and screens. The wide fan rinses rather than blasts, so it removes dirt, pollen, and mildew without raising the grain on wood or driving water under lap siding. When in doubt about a surface, start here and only move to a narrower tip if it is not cleaning.
Black: Soap Nozzle
The black tip has a much larger orifice, which drops the pressure low enough for the machine to draw detergent from its tank or siphon tube. It is not a cleaning tip on its own. Apply soap with black, let it sit a few minutes, then switch to white or green to rinse. Trying to apply detergent with any other tip will not work because the pressure is too high to pull soap through the injector.
Which Tip for Which Job
Here is the short version for the jobs most people tackle in September and October, before the washer gets put away for the season.
- Concrete driveway, sidewalk, patio: green, with yellow for oil stains and tire marks.
- Wood deck or fence: white only, held 12 to 18 inches away, moving with the grain. Green will leave lap marks on softwood.
- Vinyl or painted siding: white, spraying downward so water does not go up under the panels.
- Brick and stone: green for the surface, white near mortar joints that are already soft.
- Cars, trucks, RVs: black for soap, then white to rinse. Never green or narrower on paint.
- Outdoor furniture and grills: green on metal and plastic, white on cushions and wood.
- Loose paint before repainting: yellow, then let the surface dry fully.
Whatever the surface, test the tip on a hidden corner first.
How to Change a Pressure Washer Nozzle
Almost every consumer and light commercial washer uses a 1/4-inch quick-connect on the end of the wand. Release the trigger, pull the collar back, drop in the new tip, let the collar snap forward, and give it a tug to confirm it locked. Never change tips while the trigger is squeezed.
If tips are hard to seat or the connection drips, the culprit is almost always the small rubber O-ring inside the coupler. They flatten and crack after a season or two. A 40-pack of replacement O-rings for 1/4-inch and 3/8-inch quick connects is worth keeping in the garage. Pull the old ring out with a pick, roll the new one on, and add a drop of silicone grease so it slides in cleanly.
When to Replace Your Nozzle Tips
Nozzle tips wear out. The orifice slowly erodes, especially if your water carries sand or sediment, and a worn tip sprays a wider, weaker fan than its color suggests. Replace the set when the fan looks uneven or feathered at the edges, cleaning power drops at the same distance, or a tip is chipped or clogged with mineral scale.
A full five-piece set is inexpensive. The Twinkle Star five-nozzle tip set in 1/4-inch quick connect, sized for 2.5 GPM includes red, yellow, green, white, and the black soap tip in stainless steel, and it fits any standard 1/4-inch coupler. Check your machine's GPM rating before ordering; most residential electric and gas washers fall between 1.2 and 2.8 GPM, and a tip sized close to your flow rate gives the pressure the machine was designed to deliver.
While you are checking fittings, look at the hose too. Cracks near the ends or a bulge anywhere along the length mean it is time to replace it before it fails under pressure. You will find hoses, adapters, and couplers in our pressure washer parts and accessories collection.
Wrapping Up the Season
Two habits prevent most pressure washing damage: start about two feet from the surface and move closer only until the dirt lifts, and keep the wand moving in long, overlapping strokes. Even the white tip will mark wood if you hold it still.
September and early October are the sweet spot for the last big wash of the year, warm enough for surfaces to dry but before leaves and freezing nights make the job harder. Once the driveway, deck, and siding are done, follow our post on how to winterize a pressure washer so it starts cleanly in spring. If fall cleanup also means draining and coiling garden hoses, our garden watering and hose fittings collection has the shut-off valves and quick connectors that make that faster.
Ready to restock before the last wash of the year? Browse replacement nozzle tips, O-rings, hoses, and adapters in the Pressure Washer Parts & Accessories collection, and check the Sale collection for current markdowns.