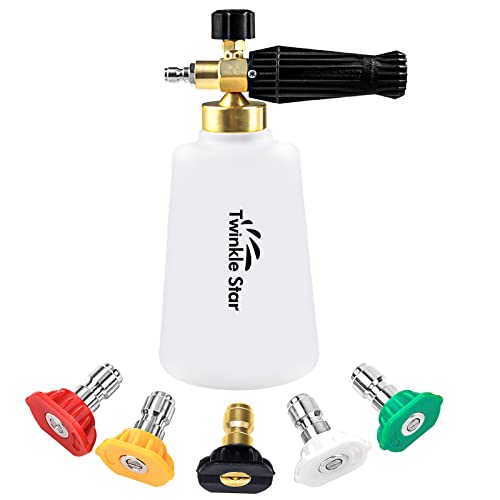
A foam cannon only works if your pressure washer can feed it enough water at enough pressure — buy the wrong bottle size or skip that check, and you'll get thin, runny suds instead of thick foam. Here's how to use one correctly and which bottle size fits your job.
Check your pressure washer first
Both foam cannon sizes carried here — the 1.5-liter and the 1-liter — specify a minimum requirement before they'll foam properly: your pressure washer needs at least 2.5 GPM (gallons per minute) flow and over 1,000 PSI. (The 1.5L listing also notes a 2.0 GPM minimum in one spec line, so treat 2.5 GPM as the safer number to check against.) If your washer is a smaller electric unit under roughly 1,800 PSI or 1.5 GPM, a foam cannon will still spray, but it likely won't generate thick, clinging foam — that's a flow and pressure limitation, not a defect in the cannon.
1.5L vs. 1L: which bottle size
- 1.5-liter foam cannon: the larger reservoir, better suited to a full vehicle, a fence run, or a driveway section where you don't want to stop and refill mid-job. Comes with 5 nozzle tips at 0°, 15°, 25°, 40°, and a soap-specific 65° pattern, plus a 1/4" quick-connect fitting.
- 1-liter foam cannon: a smaller, 33 oz bottle — fine for a single car, a window-washing session, or any job where carrying a lighter unit matters more than reservoir size. Same 1/4" quick connect, same 5-nozzle-tip set, and the listing specifies foam reach up to 20 feet.
Both use brass fittings on the core connections, not plastic, which is the part that typically wears out first on cheaper foam lances.
Mixing the soap ratio
The 1-liter unit's listing gives a concrete starting point: about 6 oz of car-wash soap topped up with warm water to fill the rest of the bottle. Warm water helps the soap dissolve and foam more fully than cold. Start at that ratio, spray a test patch, and adjust — more soap for thicker foam, more water if the foam is too heavy to rinse off, not the other way around.
Setting the nozzle
Both cannons have two adjustments: the nozzle tip (pattern, wide to narrow) and a knob that controls how much water mixes into the soap stream. For foam application, turn the knob toward the "thick" end and use the widest nozzle angle — narrow nozzle tips are for rinsing, not for applying foam. Switch to the soap-specific nozzle tip when it's time to actually lay down foam, then swap to a narrower tip afterward for rinsing.
Step by step
- Confirm your pressure washer meets the 2.5 GPM / 1,000+ PSI minimum.
- Fill the bottle with soap and warm water per the ratio above.
- Connect the 1/4" quick-connect fitting to your pressure washer gun.
- Set the nozzle to the wide/soap pattern and the knob to thick.
- Apply foam from the bottom up to avoid streaking, let it dwell per your soap's label, then rinse with a standard nozzle tip.
Quick reference
- Minimum requirement: 2.5 GPM, 1,000+ PSI (check your washer's spec plate).
- 1.5L for bigger jobs, 1L for single vehicles or lighter carrying.
- Starting ratio: ~6 oz soap + warm water to fill a 1L bottle; scale up for the 1.5L bottle.